D365 TypeScript Web Resources - Part 4 - Modules & Debugging
Before you get stuck into this make sure you’ve checked out any previous parts to the series. Each part in this series follows on from the previous, so you may need to grab the code from the previous part if you haven’t been following.
ES Modules
What are ES Modules?
ES Modules is the ECMAScript standard for working with modules.
Rather then repeat or quote others here are a couple of great articles about ES Modules:
A Sample Module
OK, so I expect the above articles have explained more that enough about es modules. Lets create a sample (because we can).
First create a new file in the src directory called sample.ts, paste the following into the file and save.
1 | export function Pointless(message: string): void { |
Our sample module exports a function called Pointless that displays a pointless message and a class called Stuff with foo and bar functions. Notice foo is public and bar private. foo calls bar which displays a foo bar message.
Lets now consume this module in our ContactMainForm class. First we need to import our function and class. Add the following at the top of contact-main-form.ts:
1 | import { Pointless, Stuff } from "./sample"; |
Now we have imported these from our module we can make use of them. Add the following to our ContactMainForm.OnLoad function (form load event handler):
1 | Pointless("This is a pointless message."); |
The complete contact-main-form.ts should now look like this:
1 | import { Pointless, Stuff } from "./sample"; |
Let’s build our code with the following command and take a look what happens…
1 | npx webpack |
You guessed it! The compiled .js now contains our ContactManForm and the imports from our module sample.ts. Webpack has bundled contact-main-form.ts and all its dependencies into single .js files! :-D
Now you can deploy and test the new script to ensure it all still works.
That is a very basic example but it should set you on the way to creating a better more maintainable structure to your code. Remember the SOLID principles!
Debugging
So, we’ve got all these lovely tools, patterns and methodologies but how can we debug our code?
Well, you can of course just load up your browsers developer tools and debug the .js files deployed to D365, but these are not a line by line representation of our TypeScript source files and the optimized version is practically unreadable!
webpack-dev-server & fiddler to the rescue!
Fiddler
I expect most will have used or heard of Fiddler. If you don’t have it installed go grab it here.
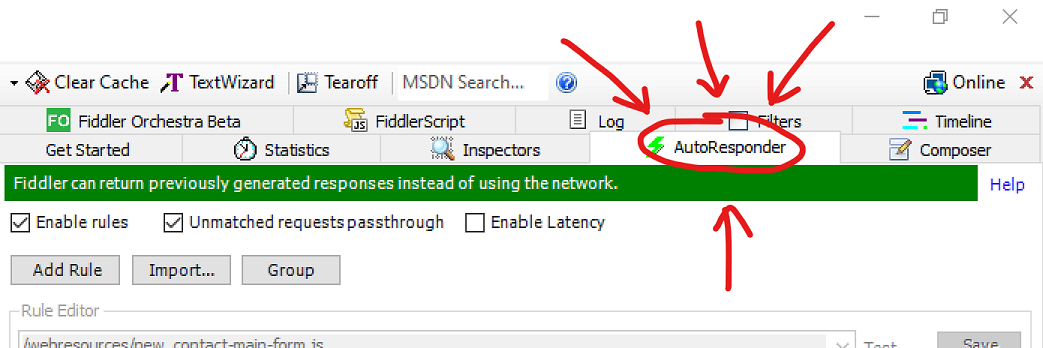
We’ll be using the Auto Responder functionality to redirect requests for our .js to a locally served file.
webpack-dev-server
Webpacks DevServer is essentially a http(s) file server.
Lets go an install the npm package…
1 | npm install webpack-dev-server --save-dev |
Next we need to add some stuff to our webpack.config.js
Fist of all we need to add the following at the top of the file:
1 | var path = require("path"); |
then wee need to add the following to the development mode section/config:
1 | devServer: { |
Your webpack.config.js should now look something like this:
1 | var path = require("path"); |
Now lets start up Webpacks DevServer via the following command
1 | npx webpack-dev-server |
Once running you should be able to browse to http://localhost:9000/ and the built .js and .map files should be served.
What’s the benefit of this I hear you ask! Well, we get a few benefits…
- we don’t have to deploy the file every time we make a change.
- Chrome/Edge (no one uses IE any more right!) will be able to load our source maps.
- The source maps will enable us to debug the TypeScript in Chrome/Edge Dev tools. Magic! ;-)
Auto Responder
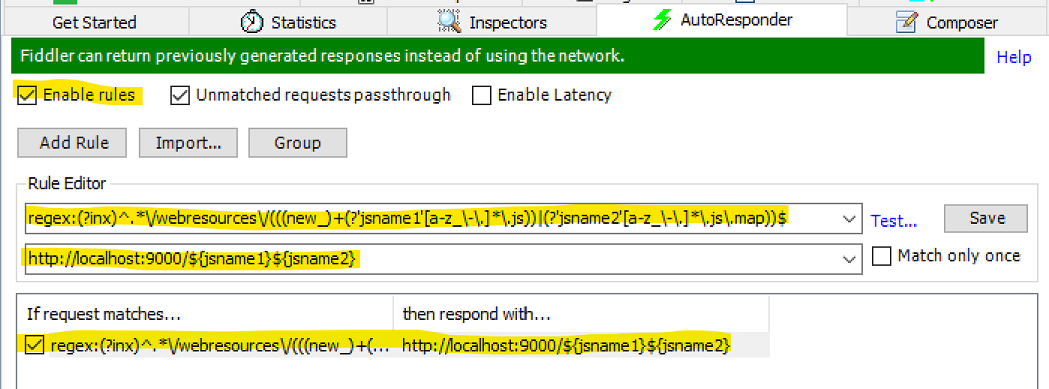
Lets setup the Fiddler Auto Responder. This is the component that will redirect request for our .js in D365 to our locally served files.
Load up Fiddler and select the Auto Responder tab on the right hand pane.
Next click Add Rule and enter the following in the Rule Editorregex:(?inx)^.*\/webresources\/(((new_)+(?'jsname1'[a-z_\-\.]*\.js))|(?'jsname2'[a-z_\-\.]*\.js\.map))$
andhttp://localhost:9000/${jsname1}${jsname2}
Then click Save
It should look like this…
Thats Fiddler setup, lets get debugging!
Debugging in Chrome Dev Tools
OK, so we have built and deployed our contact-main-form script (Assuming you followed from part 1). We also have Fiddler set up to redirect requests for our .js to local files and Webpack Dev Server serving up our files locally.
Now lets load up Chrome, browse to our D365 instance and open up a contact. Hopefully you’ll get the notification and alerts from our script!
Hit F12 to load the Developer Tools.
Next select the Source tab
Then hit Ctrl + P to open a file and type contact-main-form. You should see the .ts file in the list, click on it to open it.
Lets add a breakpoint on line 5 (click on the left margin near the number 5)
We are now ready! Hit F5 (refresh) in the browser and Chrome Dev Tools should pause on our breakpoint. Now hit F10 (Step Over) until we are paused on line 9. Feel free to inspect some of the objects and variables along the way.
We are now going to step into our Pointless function so go ahead and hit F11 (you may have to hit it 2 or 3 times to get there). But eventually you should get to line 2 of our sample module sample.ts.
Brilliant isn’t it!
No need to deploy
Right, One last thing to show you…
Lets make some changes to our ContactMainForm and test/debug without the hassle of having to deploy/upload the file to D365. Obviously once you’ve finished your development you’ll need to deploy the file to D365, but this method speeds up your dev/test process.
First lets make a change.
I’m going to change the pointless message…
1 | Pointless("This REALLY is a pointless message."); |
Save the file and the build via the following command
1 | npx webpack |
Refesh the browser and in Dev Tools you should see our changes and be able to debug.
That’s all folks!
I hope that has been useful!
You can download a copy of the source code for this blog post here
In the next part we’ll take a look at unit testing and few useful tweaks to help some of the processes covered so far.
Thanks for reading.
Ollie